달력

42024  이전 다음

  • 1
  • 2
  • 3
  • 4
  • 5
  • 6
  • 7
  • 8
  • 9
  • 10
  • 11
  • 12
  • 13
  • 14
  • 15
  • 16
  • 17
  • 18
  • 19
  • 20
  • 21
  • 22
  • 23
  • 24
  • 25
  • 26
  • 27
  • 28
  • 29
  • 30

'프로그래밍/WEB'에 해당되는 글 4건

  1. 2016.09.23 CSS 테이블 기본
  2. 2016.09.23 javascript:버튼(button)으로 팝업(popup) 띄우기
  3. 2016.09.23 [HTML5] File API
  4. 2016.09.23 Tomcat7 Web Application Deploy 하기
프로그래밍/WEB 2016. 9. 23. 10:56

<style>

.table1_1 table {

width:100%;

margin:15px 0

}

.table1_1 th {

background-color:#AAEBAA;

color:#000000

}

.table1_1,.table1_1 th,.table1_1 td

{

font-size:0.95em;

text-align:center;

padding:4px;

border:1px solid #dddddd;

border-collapse:collapse

}

.table1_1 tr:nth-child(odd){

background-color:#e2f8e2;

}

.table1_1 tr:nth-child(even){

background-color:#fdfdfd;

}

</style>

<table class=table1_1>

<tr>

<th>SAMPLE</th><th>SAMPLE</th><th>SAMPLE</th>

</tr>

<tr>

<td>SAMPLE</td><td>SAMPLE</td><td>SAMPLE</td>

</tr>

<tr>

<td>SAMPLE</td><td>SAMPLE</td><td>SAMPLE</td>

</tr>

<tr>

<td>SAMPLE</td><td>SAMPLE</td><td>SAMPLE</td>

</tr>

<tr>

<td>SAMPLE</td><td>SAMPLE</td><td>SAMPLE</td>

</tr>

</table>


'프로그래밍 > WEB' 카테고리의 다른 글

javascript:버튼(button)으로 팝업(popup) 띄우기  (0) 2016.09.23
[HTML5] File API  (0) 2016.09.23
Tomcat7 Web Application Deploy 하기  (0) 2016.09.23
Posted by 당구치는 개발자
|
프로그래밍/WEB 2016. 9. 23. 10:54


버튼(button)으로 팝업(popup) 띄우기

ex>
onclick="window.open('URL', '_blank', 'width=730, height=750, toolbar=no, menubar=no, scrollbars=no, resizable=no, copyhistory=no' );"

window.open(주소, 창, 옵션); <== 이런식으로 사용 하며 됩니다.

fullscreen  = yes를 주면 창이 전체 창으로 뜹니다. (기본값은 no)
location  = yes를 주면 주소창이 활성화 됩니다. (기본값은 yes)
menubar  = yes를 주면 툴바가 나옵니다. (기본값은 yes)
resizable  = yes를 주면 창 사이즈 변경이 가능 합니다. (기본값은 yes)
scrollbars  = yes를 주면 창 스크롤바가 생깁니다. (기본값은 yes)
titlebar = yes를 주면 타이틀바가 나옵니다.  (기본값은 yes)
toolbar = yes를 주면 툴바가 나옵니다. (기본값은 yes)
width = 열리는 창의 가로 크기
height = 열리는 창의 세로 크기


출처 : http://hunelee.blogspot.kr/2014/01/javascriptbutton-popup.html

'프로그래밍 > WEB' 카테고리의 다른 글

CSS 테이블 기본  (0) 2016.09.23
[HTML5] File API  (0) 2016.09.23
Tomcat7 Web Application Deploy 하기  (0) 2016.09.23
Posted by 당구치는 개발자
|
프로그래밍/WEB 2016. 9. 23. 10:53


안녕하세요?

이번엔 HTML 5 의 File API 를 살펴보려 합니다.

이젠 Web Application 으로 사용자 PC 의 파일을 건드릴 수 있습니다. File API 로 요... 이젠 훨씬 더 많은 일들을 할 수 있겠죠?
엄청나다고 생각하지 않으신가요?

20-1. File API Interface

  • File interface
  • FileReader interface

File interface 를 사용하면 File 의 File Name 이나 Size 등 기본적인 정보에 접근 할 수 있습니다.
File Reader interface 는 File 의 내용을 읽을 수 있는 기능을 제공합니다.

아... 갑자기 걱정하시는 분들이 계시겠죠?
그럼. 보안은? 이라고...
File interface 는 Browser 가 막 건드릴 수있는 것이 아니라 File 선택 Form 이나 Drag & Drop 을 통해서 사용자가 직접 선택한 File에 한정되므로 안심해도 좋을 것입니다. 


20-2. File interface

File interface 가 가지고 있는 속성과 함수는 다음과 같습니다.

Attribute/Method설명
nameFile 이름
typeFile 의 MIME Type(알수 없을때는 null)
urnFile 의 범용 식별자
sizeFile Size
slice(start, length)시작위치와 끝 위치를 지정하여 파일의 내용을 잘라내 새로운 Blob객체를 만드는 함수

위 사항들은 아래 예제에서 사용법을 확인하실 수 있을 것입니다.

20-3. FileReader interface

FileReader interface 는 비동기적인 상황에서 사용을 하는데요.
다음은 FileReader interface 가 가지고 있는 속성과 함수들입니다. 

Attribute/Method설명
readAsBinaryString(fileBlob)File 내용을 읽어 Binary 문자열로 저장
readAsText(fileBlob, encoding)File 내용을 읽어 들여 문자열로 저장, 두번째 인수는 File 의 문자 encodeing 을 지정할 수 있음(기본값 : UTF-8)
readAsDataURL("file)File 내용을 읽어 dataURL 형식의 문자열로 저장
result읽어들인 File 내용
errorerror 발생시의 error 정보
onload읽어들이기에 성공 했을 때 호출하는 event handler. load event 에 대응
onprogress읽어들이기의 진행 상황을 얻을 수있는 event handler. progress event 에 대응
onerror읽어들이기 error 시에 호출되는 event handler. error event 에 대응.


20-4. Error

다음은 FileReader 가 동작하는 중에 발생하는 Error 에 대한 상수값들입니다.

상수Code설명
NOT_FOUND_ERR1읽을 File 을 찾지 못할때
SECURITY_ERR2Web Application 이 Access 하기에 안전하지 못한 File일 때
File 에 너무 많은 읽기 호출이 있을 때
사용자의 선택한 이후에 File 에 변경이 있을 때 
인 상황에서 사용할 수 있습니다.
ABORT_ERR3예를 들어 abort() 함수 호출과 같은 것으로 인해 읽기가 중지되었을 때
NOT_READABLE_ERR4File 접근 권한 문제와 같은 것으로 인해 File 을 읽지 못할때
ENCODING_ERR5동기적, 비동기적으로 readAsText() 함수를 사용할 때는 사용할 수없습니다.
DataURL FH 로 표현될 수 있는 File 이나 Blob 을 구현한 제한된 곳의 DataURL 에 대한 URL 길이 제한에 걸렸을 때


20-5. 사용법

File interface 는 다음과 같이 사용할 수있습니다. File Name 과 File Size 를 조회합니다.

var file = document.getElementById("file").files[0];

document.getElementById("fileName").textContent = file.name;
document.getElementById("fileSize").textContent = "(" + file.size + "byte)";


다음은 FileReader 를 생성하여 사용하는 방법입니다.

var reader = new FileReader();


20-6. 예제

이젠 위 내용들을 바탕으로 예제를 살펴보겠습니다.
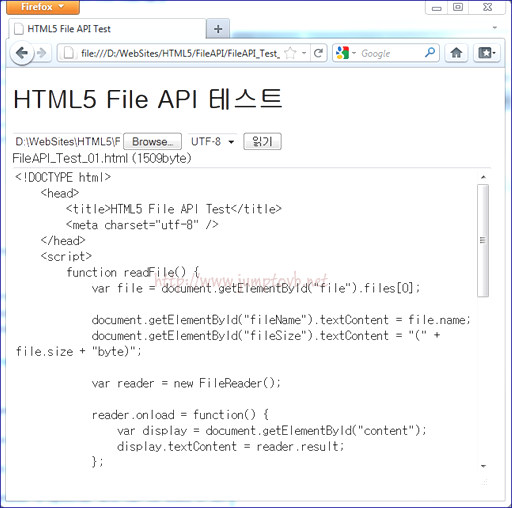
아래 예제는 File interface 와 FileReader interface 를 사용하여 File 을 선택하여 File 의 이름과 Size 를 표시하고, File 의 내용을 읽어 TextBox 에 표시합니다.

<!DOCTYPE html>
    <head>
       <title>HTML5 File API Test</title>
        <meta charset="utf-8" />
    </head>
    <script>
        function readFile() {
            var file = document.getElementById("file").files[0];

            document.getElementById("fileName").textContent = file.name;
            document.getElementById("fileSize").textContent = "(" + file.size + "byte)";

            var reader = new FileReader();

            reader.onload = function() {
                var display = document.getElementById("content");
                display.textContent = reader.result;
           };

           reader.onerror = function(evt) {
                alert(evt.target.error.code);
            };

            var encodingList = document.getElementById("encoding");
            var encoding = encodingList.options[encodingList.selectedIndex].value; 

           reader.readAsText(file, encoding);

        };
    </script>
    <body>
        <h1>HTML5 File API 테스트</h1>
       <input id="file" type="file">
       
<select id="encoding">
           <option>UTF-8</option>
        </select>
        <button onclick="readFile()">읽기</button><br />
        <div>
            <span id="fileName">File Name</span>
            <span id="fileSize">File Size</span>
        </div>
        <textarea id="content" readonly style="width:600px; height:400px;"></textarea>
    </body>
</html>

위 파일은 저장할 때 UTF-8 방식으로 저장해 주십시요. 읽을 때 Encoding 을 UTF-8 로 읽겠다고 했으니 말이죠...

Web Page 를 실행시키고 위 파일을 다시 읽어봤습니다.

FileAPI_01.jpg


여러분들께서도 한번 작성하시고 실행시켜보십시요.

비동기 방식의 FileReaderSync 도 있습니다만 Worker 안에서 사용해야하고 FileReader 보다는 간단하다는 특징이 있습니다. 
다른 사항들은 거의 비슷하므로 접근하기는 비동기방식의 FileReader보다 훨씬 쉬우실 것입니다.


이제까지 File API 를 살펴보았습니다.
이젠 Web Page 에서 내 PC 의 File 을 읽기위해서 File 을 서버로 Upload 할 필요가 없습니다.
그만큼 Server 의 부하도 줄일수 있겠고, Upload 하고 File 을 읽고 다시 읽은 Streaming 을 내 PC 로 받는 등의 진행되는 동안의 대기 시간이 줄어들 것입니다.


위의 내용들은
혁명을 꿈꾸다 HTML5 & API 입문
을 참고 하였습니다.


출처 : http://www.sqler.com/402253

'프로그래밍 > WEB' 카테고리의 다른 글

CSS 테이블 기본  (0) 2016.09.23
javascript:버튼(button)으로 팝업(popup) 띄우기  (0) 2016.09.23
Tomcat7 Web Application Deploy 하기  (0) 2016.09.23
Posted by 당구치는 개발자
|
프로그래밍/WEB 2016. 9. 23. 10:52


Tomcat7은 설치 되어 있다고 가정 한다. War 파일도 준비해야 한다.


Step 1.  Admin 계정 만들기

D:\Develop\was\tomcat\apache-tomcat-7.0.35\conf\tomcat-users.xml 파일을 수정 하자.


<?xml version='1.0' encoding='utf-8'?>

<!--

  Licensed to the Apache Software Foundation (ASF) under one or more

  contributor license agreements.  See the NOTICE file distributed with

  this work for additional information regarding copyright ownership.

  The ASF licenses this file to You under the Apache License, Version 2.0

  (the "License"); you may not use this file except in compliance with

  the License.  You may obtain a copy of the License at


      http://www.apache.org/licenses/LICENSE-2.0


  Unless required by applicable law or agreed to in writing, software

  distributed under the License is distributed on an "AS IS" BASIS,

  WITHOUT WARRANTIES OR CONDITIONS OF ANY KIND, either express or implied.

  See the License for the specific language governing permissions and

  limitations under the License.

-->

<tomcat-users>

<!--

  NOTE:  By default, no user is included in the "manager-gui" role required

  to operate the "/manager/html" web application.  If you wish to use this app,

  you must define such a user - the username and password are arbitrary.

-->

<!--

  NOTE:  The sample user and role entries below are wrapped in a comment

  and thus are ignored when reading this file. Do not forget to remove

  <!.. ..> that surrounds them.

-->

<!--

  <role rolename="tomcat"/>

  <role rolename="role1"/>

  <user username="tomcat" password="tomcat" roles="tomcat"/>

  <user username="both" password="tomcat" roles="tomcat,role1"/>

  <user username="role1" password="tomcat" roles="role1"/>

-->

<role rolename="manager-gui" />

      <user username="min" password="min" roles="manager-gui" />


</tomcat-users>


관리자에 해당하는 권한을 주고 아이디를 생성 했다.


Step 2.  서버 시작 하기


  • Windows -> D:\Develop\was\tomcat\apache-tomcat-7.0.35\bin\startup.bat
  • Linux -> D:\Develop\was\tomcat\apache-tomcat-7.0.35\bin\startup.sh

OS에 맞는 파일을 실행 한다. 


2013. 2. 1 오후 3:04:24 org.apache.catalina.core.AprLifecycleListener init
정보: Loaded APR based Apache Tomcat Native library 1.1.24 using APR version 1.4.6.
2013. 2. 1 오후 3:04:24 org.apache.catalina.core.AprLifecycleListener init
정보: APR capabilities: IPv6 [true], sendfile [true], accept filters [false], random [true].
2013. 2. 1 오후 3:04:24 org.apache.catalina.core.AprLifecycleListener initializeSSL
정보: OpenSSL successfully initialized (OpenSSL 1.0.1c 10 May 2012)
2013. 2. 1 오후 3:04:25 org.apache.coyote.AbstractProtocol init
정보: Initializing ProtocolHandler ["http-apr-8080"]
2013. 2. 1 오후 3:04:25 org.apache.coyote.AbstractProtocol init
정보: Initializing ProtocolHandler ["ajp-apr-8009"]
2013. 2. 1 오후 3:04:25 org.apache.catalina.startup.Catalina load
정보: Initialization processed in 1208 ms
2013. 2. 1 오후 3:04:25 org.apache.catalina.core.StandardService startInternal
정보: Starting service Catalina
2013. 2. 1 오후 3:04:25 org.apache.catalina.core.StandardEngine startInternal
정보: Starting Servlet Engine: Apache Tomcat/7.0.35
2013. 2. 1 오후 3:04:25 org.apache.catalina.startup.HostConfig deployWAR
정보: Deploying web application archive D:\Develop\was\tomcat\apache-tomcat-7.0.35\webapps\ROOT.war
2013. 2. 1 오후 3:04:26 org.apache.catalina.startup.HostConfig deployDirectory
정보: Deploying web application directory D:\Develop\was\tomcat\apache-tomcat-7.0.35\webapps\docs
2013. 2. 1 오후 3:04:26 org.apache.catalina.startup.HostConfig deployDirectory
정보: Deploying web application directory D:\Develop\was\tomcat\apache-tomcat-7.0.35\webapps\examples
2013. 2. 1 오후 3:04:26 org.apache.catalina.startup.HostConfig deployDirectory
정보: Deploying web application directory D:\Develop\was\tomcat\apache-tomcat-7.0.35\webapps\host-manager
2013. 2. 1 오후 3:04:26 org.apache.catalina.startup.HostConfig deployDirectory
정보: Deploying web application directory D:\Develop\was\tomcat\apache-tomcat-7.0.35\webapps\manager
2013. 2. 1 오후 3:04:26 org.apache.coyote.AbstractProtocol start
정보: Starting ProtocolHandler ["http-apr-8080"]
2013. 2. 1 오후 3:04:26 org.apache.coyote.AbstractProtocol start
정보: Starting ProtocolHandler ["ajp-apr-8009"]
2013. 2. 1 오후 3:04:26 org.apache.catalina.startup.Catalina start
정보: Server startup in 1546 ms


Step 3.  관리자 페이지 접속 하기

따로 설정을 하지 않았다면 http://localhost:8080/manager 로 접속 한다.


방금 만들었던 Admin 계정을 입력 한다.


위와 같은 페이지가 뜨면 성공 이다. Applications 현황이나, Server Status를 볼 수 있다. 


Step 4.  War Deploy 하기

스크롤을 내리다 보면 아래와 같은 메뉴가 있다.


실행 절차


  1. 찾아보기 버튼을 클릭하여 War 파일을 추가 한다.
  2. Deploy 버튼을 클릭 한다.

참고) War 파일의 이름이 Context Path 가 된다. 아래 그림에 /whitelife 라고 추가 된 것을 볼 수 있다.


2013. 2. 1 오후 3:18:11 org.apache.catalina.startup.HostConfig deployWAR

정보: Deploying web application archive D:\Develop\was\tomcat\apache-tomcat-7.0.35\webapps\whitelife.war


정상적으로 Deploy가 된 경우, Applications 제일 밑에 추가 된 것을 볼 수 있다.

상황에 따라서 해당 Application을 Stop, Reload, Undeploy 할 수 있다.


Step 5.  Hello World !!! 확인하기


위 페이지가 떳다면 성공이다.


출처 : http://blog.whitelife.co.kr/73

'프로그래밍 > WEB' 카테고리의 다른 글

CSS 테이블 기본  (0) 2016.09.23
javascript:버튼(button)으로 팝업(popup) 띄우기  (0) 2016.09.23
[HTML5] File API  (0) 2016.09.23
Posted by 당구치는 개발자
|